However, don't worry! As usual, there is a way out, even more than one. In this guide, we'll try to give you a short overview of the most available options.
Shopify Email Forwarding
Very few entrepreneurs would risk their reputations and communicate with clients through Gmail or Yahoo accounts. It looks more professional to use an email with a brand name. That's why merchants usually use a personal domain name. Another reason for doing it is that you cannot set up email forwarding on your store without a custom domain.
Have you encountered any difficulties? Contact us!
Email forwarding is the easiest way to let your website visitors write to multiple fancy email addresses with your brand domain. All the letters sent there will be automatically redirected to an email account of your choice.
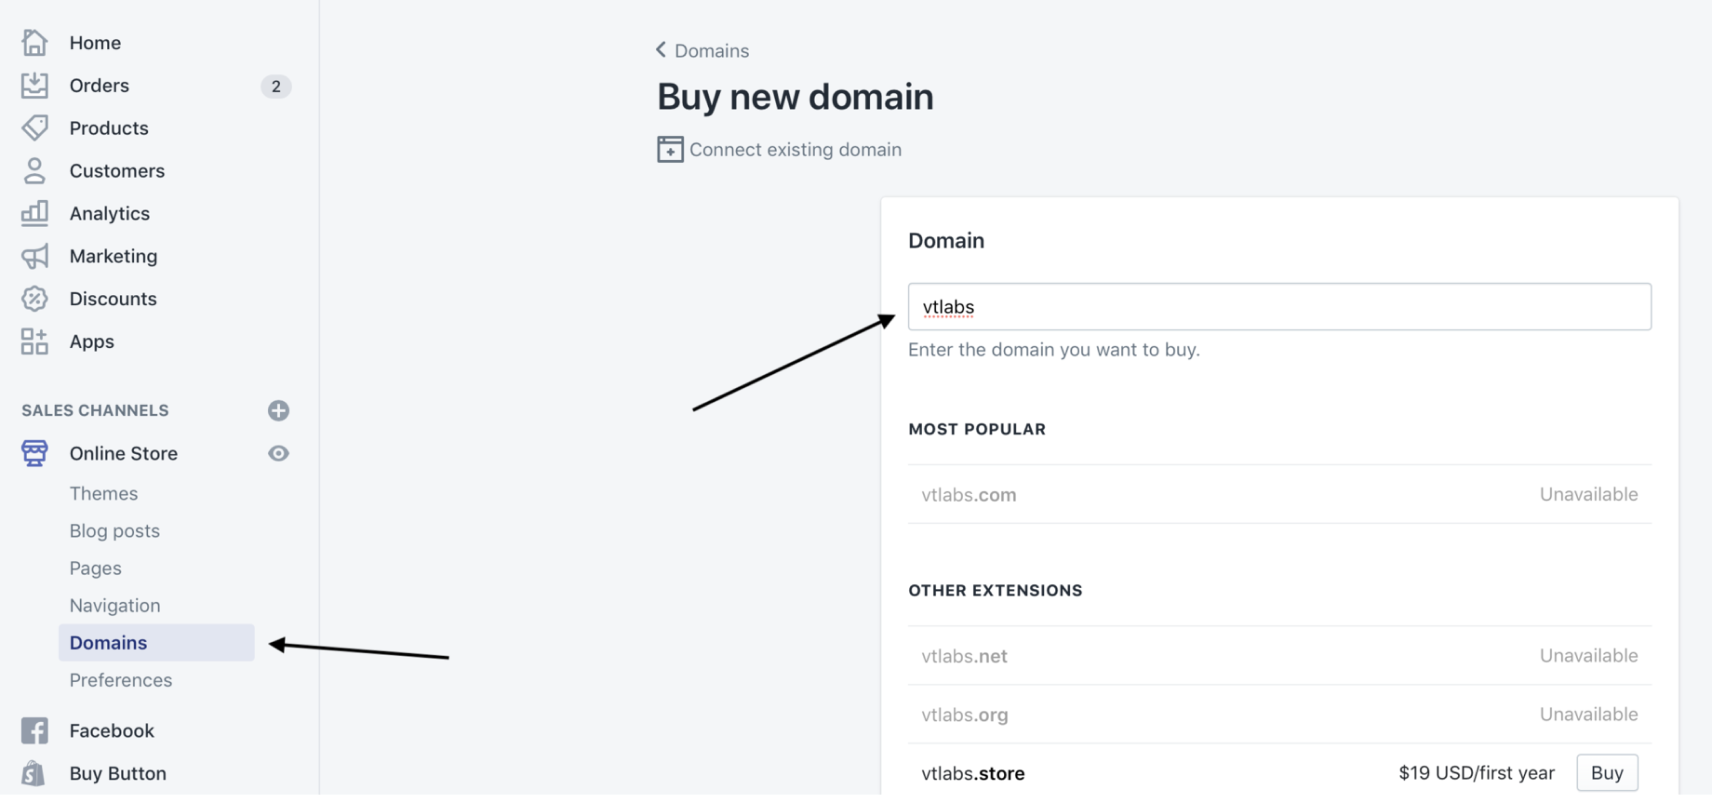
To purchase a domain on Shopify, click Domains in the sidebar of your store admin and then press the button "Buy a new domain." Type in the input box the name you want to use, and you'll see all available extensions and their price. Choose one and click Buy. The purchased domain name will appear in the "Shopify managed domains" section.
To transfer your third-party domain to Shopify, select "Transfer domain" and work through the 3 steps they provide you.
Now, you are ready to proceed with the email forwarding setup for Shopify-managed domains.
Choose the domain you want to use email forwarding with and click it.
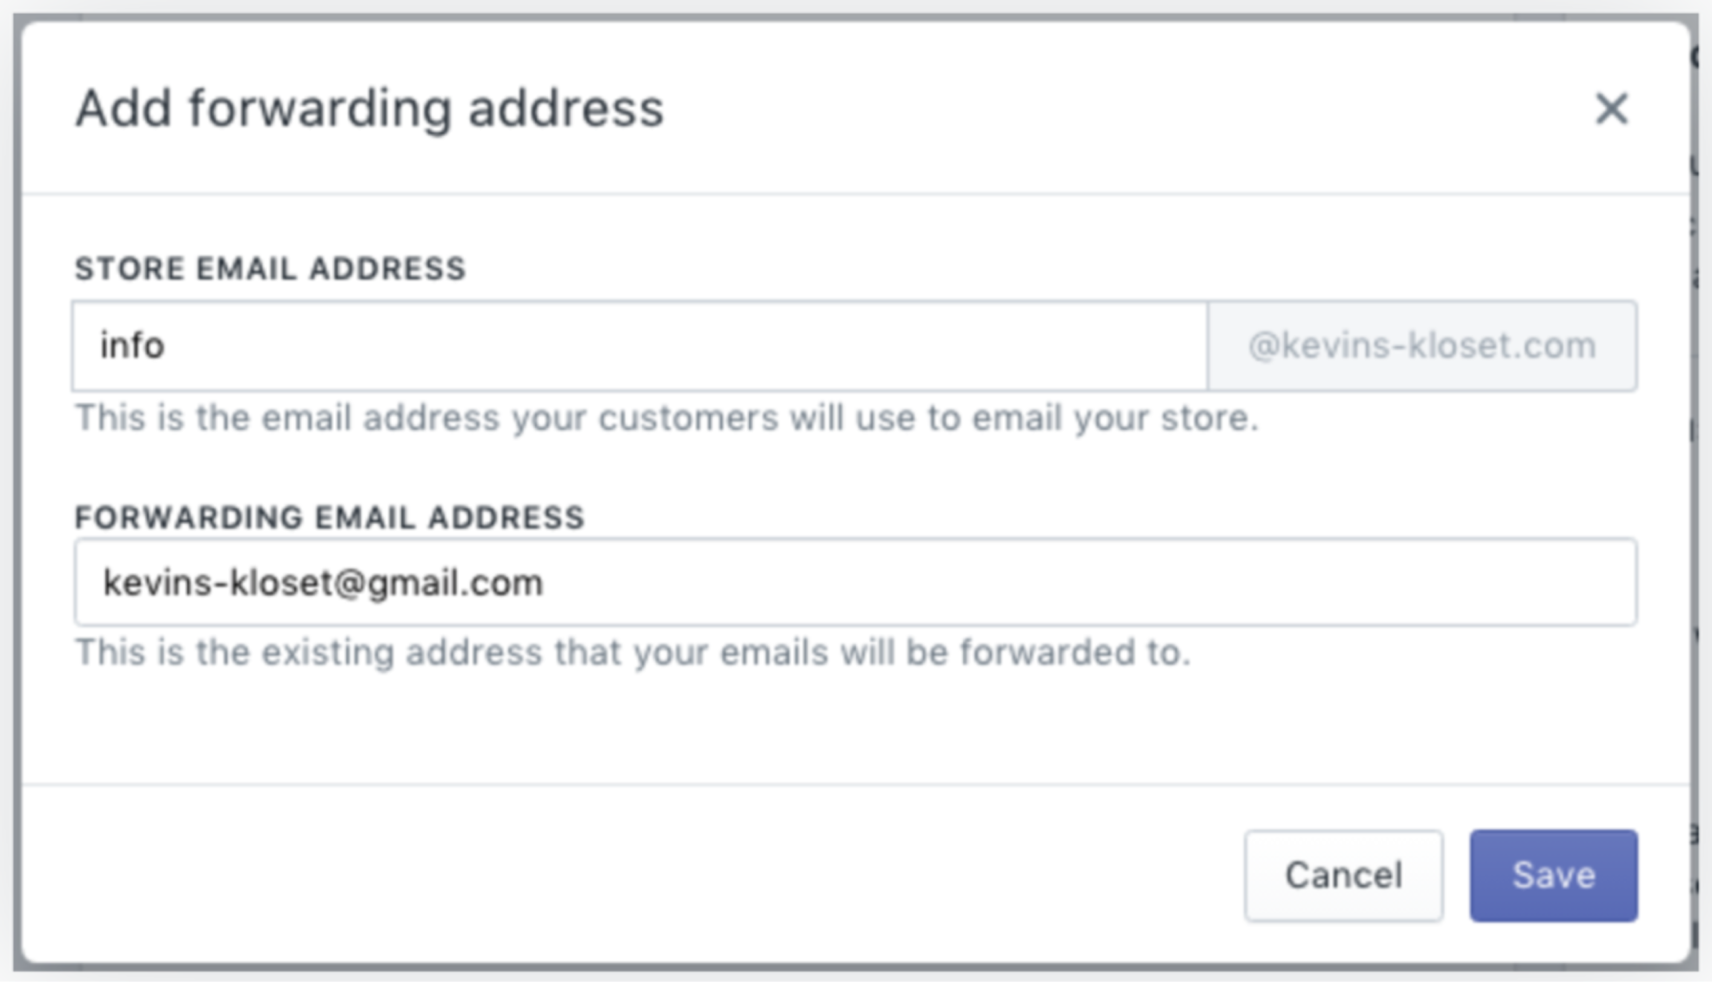
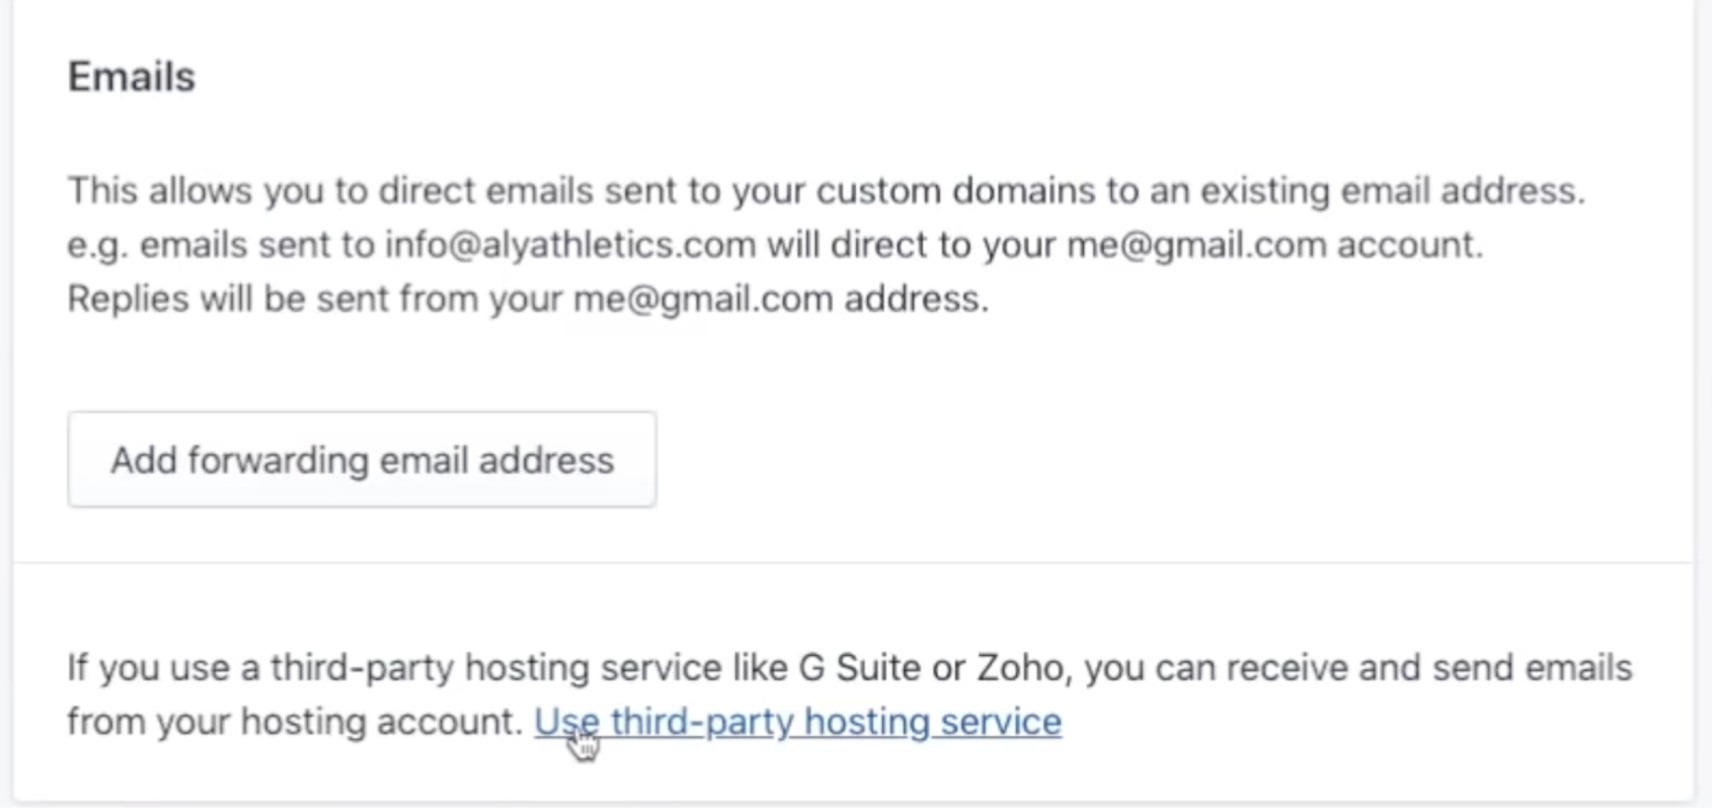
Click the "Add forwarding email address" button in the appeared menu.
Type the address your clients will use to contact your company in the "STORE EMAIL ADDRESS" input. There's no need to include the domain name, as it's already there by default.
In the "FORWARDING EMAIL ADDRESS" input, type the address to the messages that will be forwarded. It can be any existing email account you want.
Save the settings.
If you want to create another email address, you must repeat the above-listed steps. You can add any number of emails depending on your business needs. New addresses are not necessarily associated with only one email. Messages sent to created addresses can be forwarded to different email accounts.
As you can see, it is pretty easy to set up email forwarding for domains bought on or transferred to the Shopify platform. Unfortunately, this method doesn't allow you to reply to your customers without revealing your regular email address. However, it can be useful for accepting requests and other kinds of one-way correspondence.
In case it is crucial for your business to reply to your clients from the corporate domain name, you need to use a third-party email hosting service like Zoho or G Suite.
Drive more sales with Klaviyo, a marketing automation platform.
Zoho
Zoho is the perfect choice for small businesses with limited funds and those who don't want to spend much on email hosting. It has numerous tools to make your life easier.
To establish email service with Zoho:
First, you need to create a free account there. Follow the link https://www.zoho.com/mail/ and press the "Sign up now" button with the "Business Email" option elected.
You'll see all the pricing plans available. Pick the one that meets your business needs the most. There is also a free package. You can add up to 5 users and have email hosting for a single domain using that.
After you sign up for a preferable plan, enter your domain name in the appearing text box.
Then fill out the form provided.
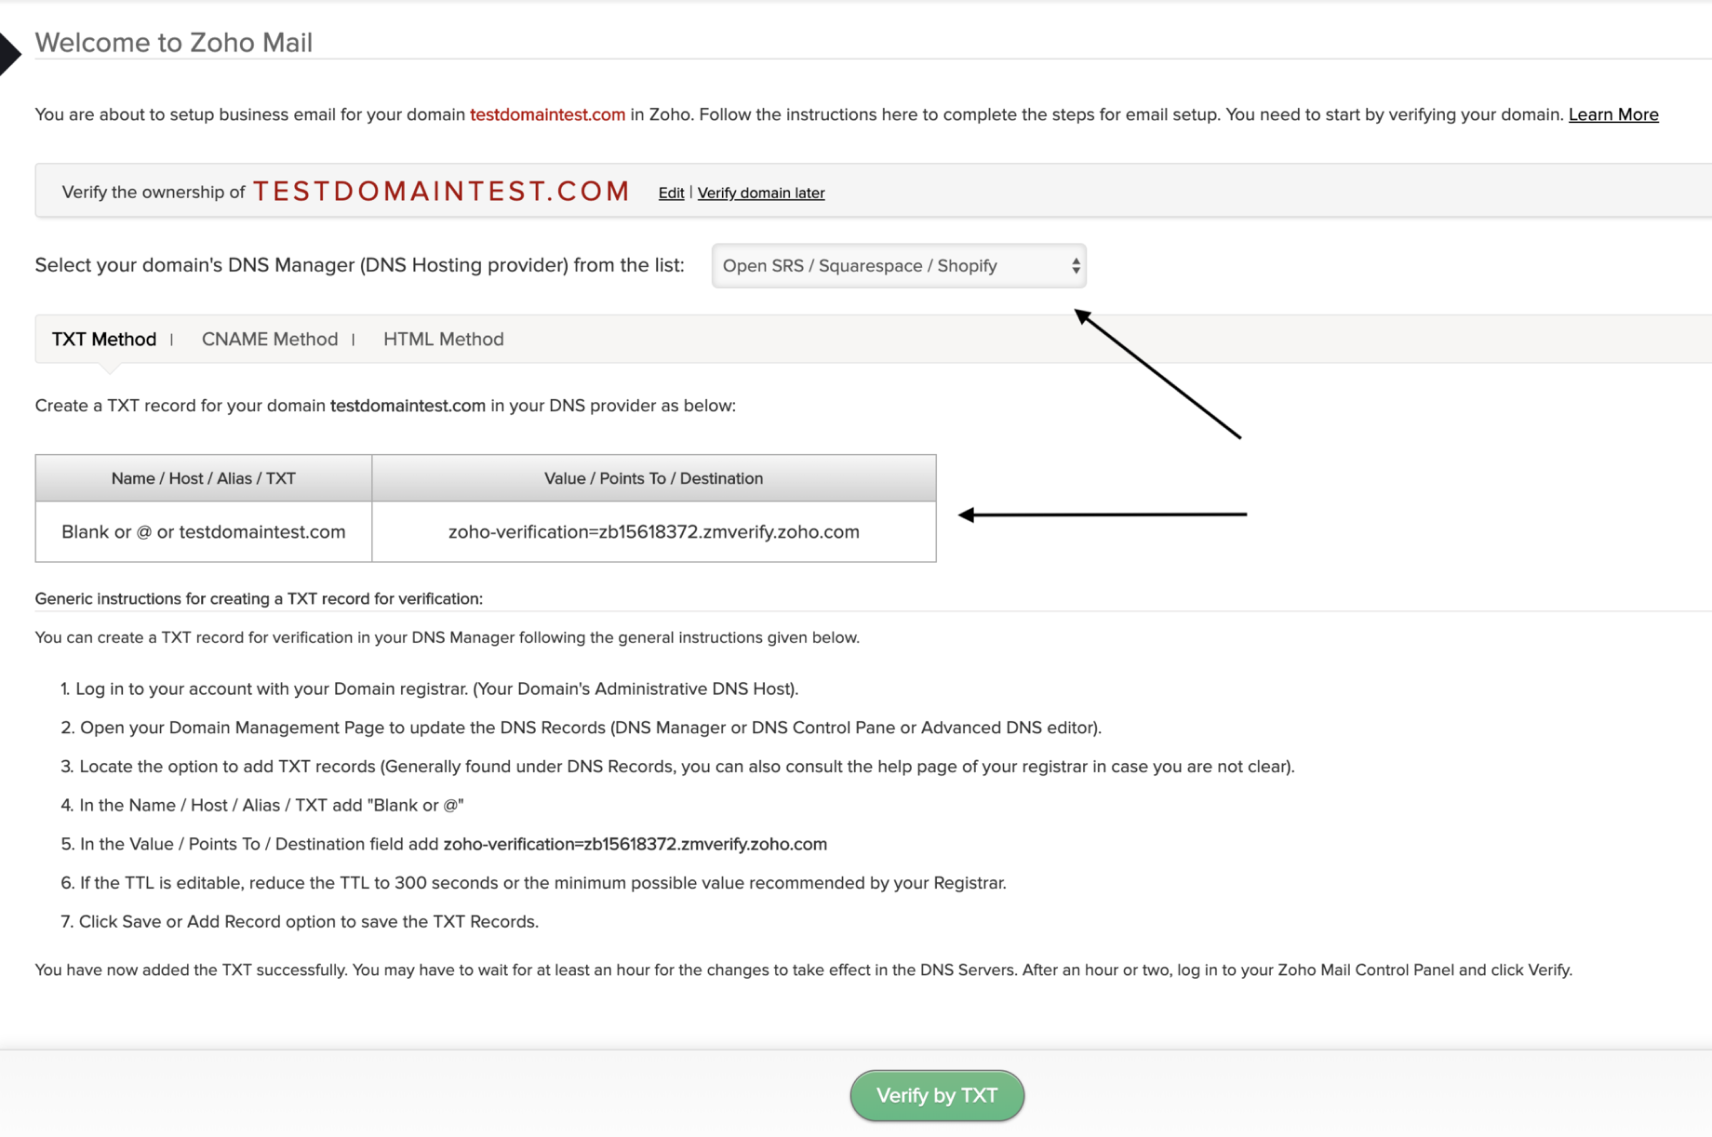
The next step is to verify your domain.
In the dropdown menu, select your DNS provider. In our case, it would be the "Open SRS / Squarespace / Shopify" option.
Copy the text inside the “Value / Points To / Destination” box. It is a TXT record you need to associate with Shopify.
From the Shopify admin, go to Online Store > Domains > Shopify managed domains and choose the domain you're setting up email forwarding for.
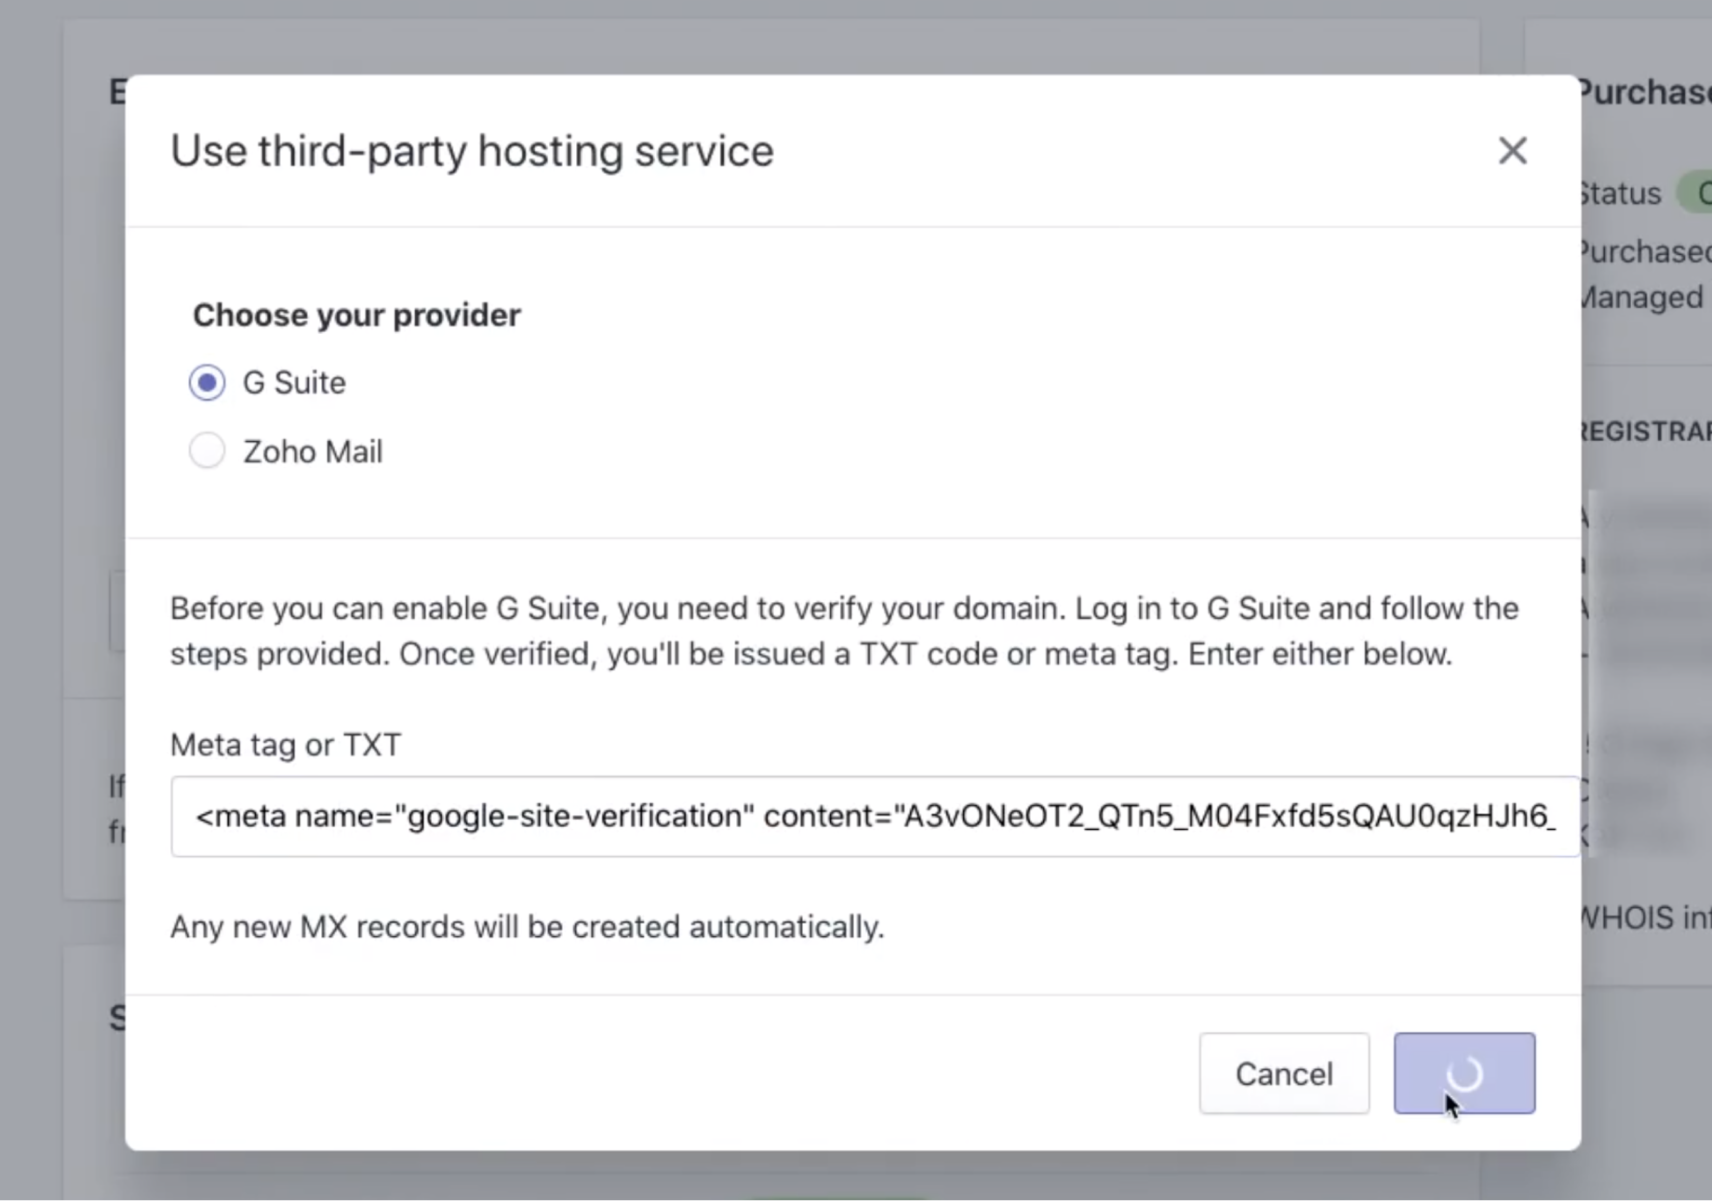
On the appeared dashboard, click on "Use third-party hosting service." Select "Zoho Mail" in the new window and paste the copied TXT record into the input below. Click "Save."
3. Now, return to your Zoho tab and press the "Verify by TXT" button. After everything is done, it usually takes some time before your email forwarding starts working. Be patient.
Google Workspace(G Suite)
G Suite is a business version of all the Google tools you already know and appreciate. It doesn't have a free plan, but many users opt for it anyway, as G Suite offers a high-quality integration of Google drives, calendars, documents, etc.
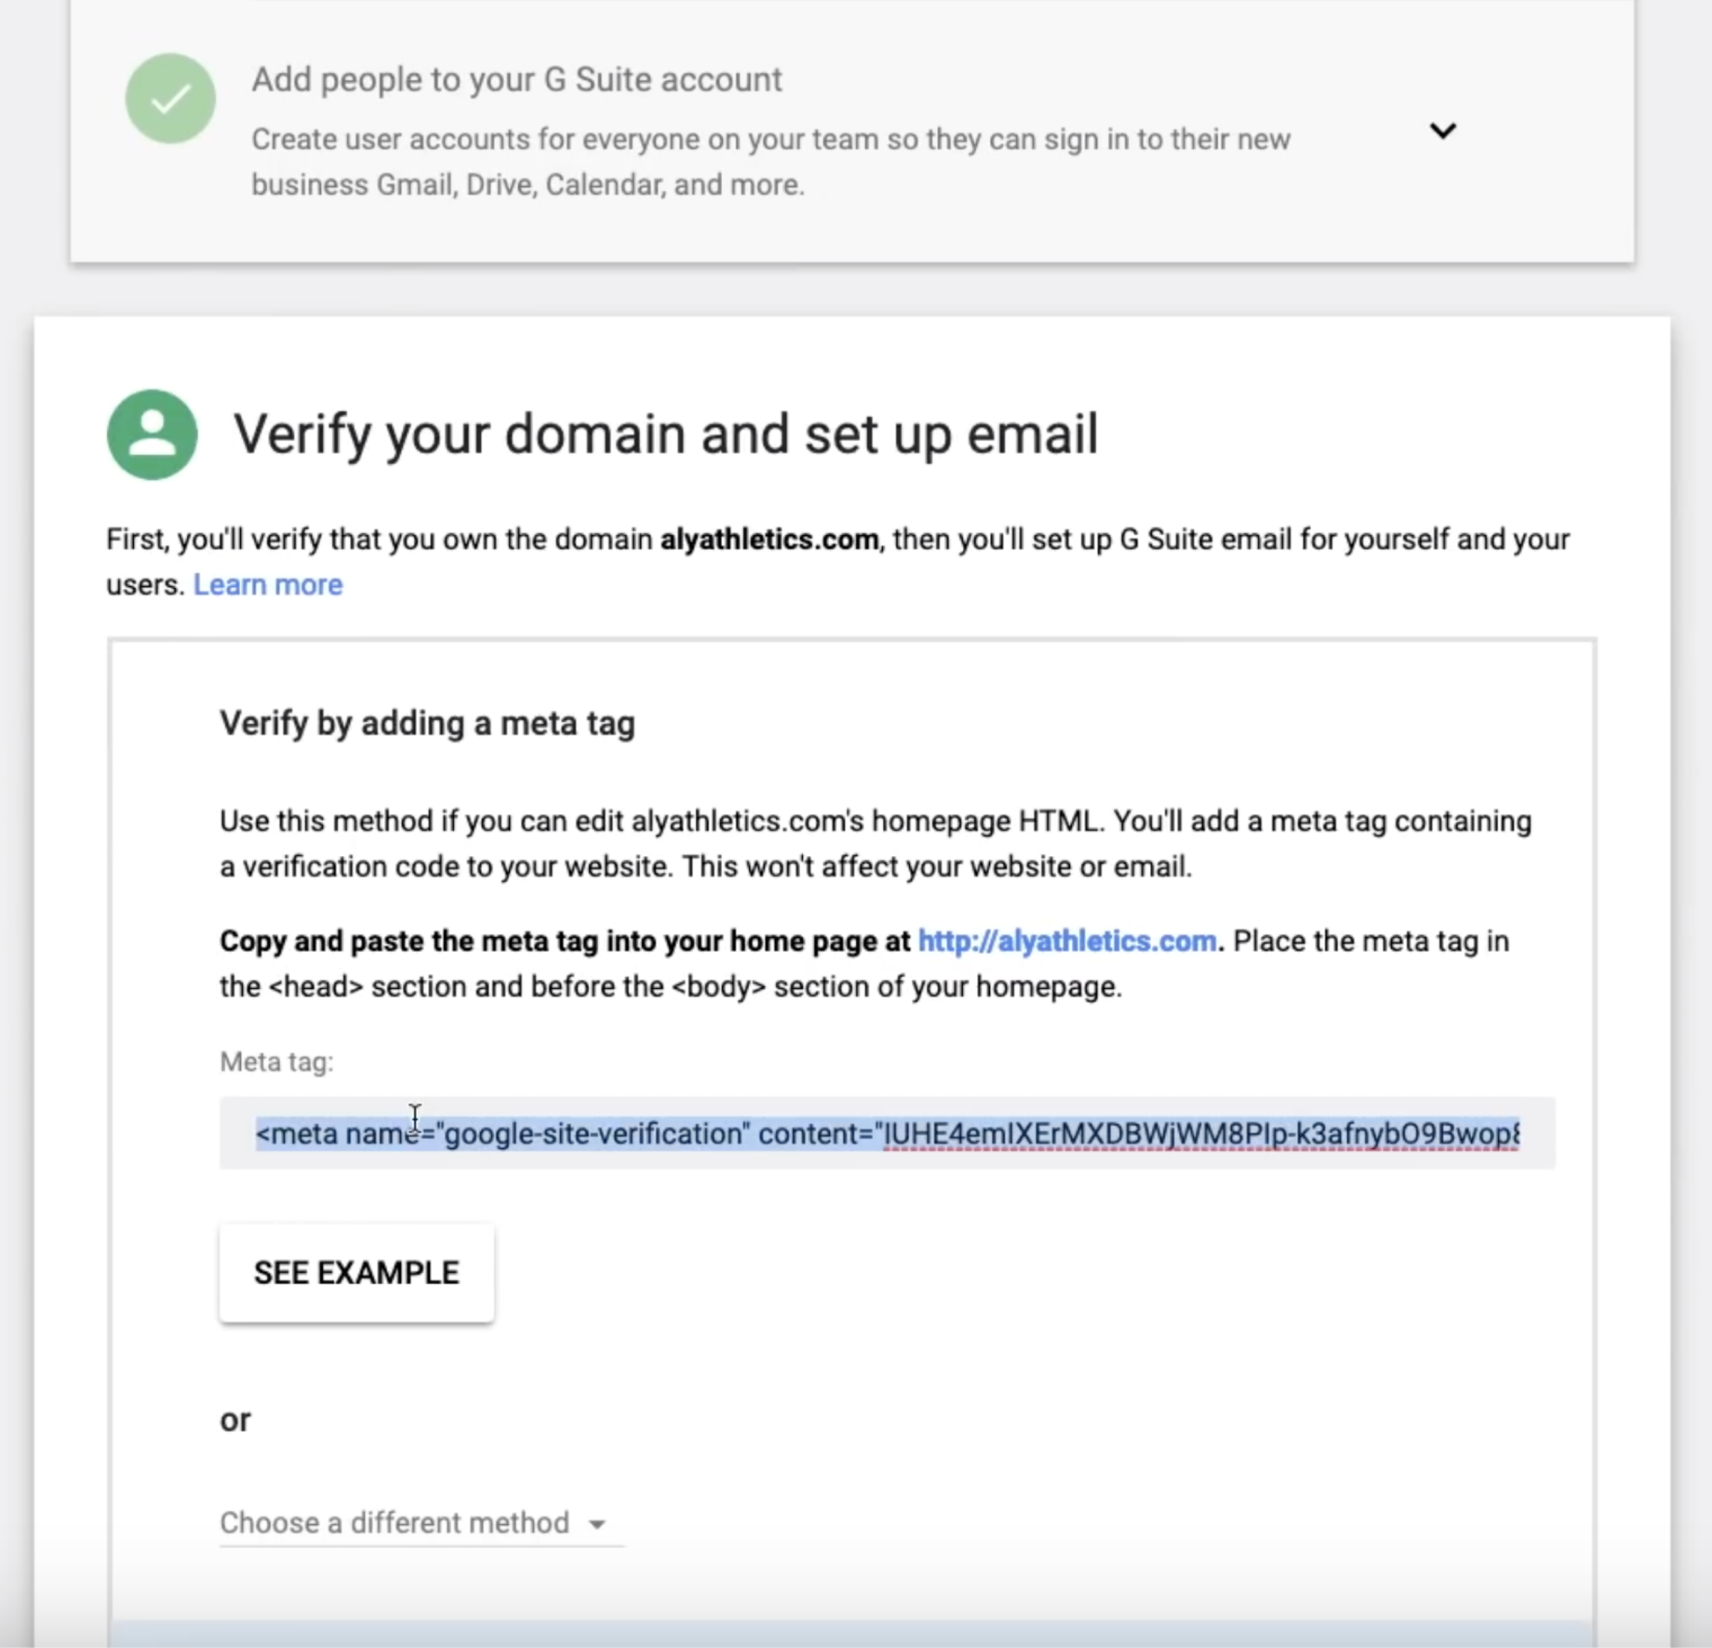
Also, connecting this hosting service to Shopify is easier because it provides a meta tag in the section of the domain verification while setting up your business account.
So again, you click Online Store > Domains > the desired domain for email forwarding, press "Use third-party hosting service." You select "G Suite" this time and paste the meta tag copied from your G Suite account. Save the settings.
Then follow G Suite instructions to finish your Shopify domain verification and give it some time to update. This method doesn't require any manual changes in DNS settings.
On the contrary, if you use an email hosting service other than Zoho or G Suite, you must add the records to DNS by hand.
Go to Online Store > Domains > the chosen domain. Then click DNS settings. In the appeared menu, press the "Add custom record" button. Select the type of record you want to add to the dropdown list. Depending on your email host, it would most likely be either MX or TXT. After that, you need to paste into the text inputs the required data copied from the setup instruction on your hosting website. Click Confirm.
Regardless of your email forwarding setup method, it is important to test if everything works correctly before using the new function.
Sell your products anywhere with Shopify. Shopify has everything you need to start selling, all in one place. Try Shopify free for 14 days. No credit card is required. Click the link and start a free trial of Shopify!
Conclusion
Now you know how to set up email forwarding for custom domains purchased on or transferred to Shopify. It lets you maintain a professional look at your business and gain buyers' trust.
